Slayin’ the 90s like Buffy
The 90s trend has been going strong since last year and the popularity of brown lipsticks, thanks to Kylie Jenner. I have been using brown lipsticks for ages, because I can never let the 90s go. Clinging on to youth for dear life. Personally, I thought that the trend would die. But it is now at its climax with not just 90s makeup trends making a comeback, but also 90s style clothing and fashion.

I’m all for that. I know that trends come and go but this one is one that refuses to go away. As with everyone else, I love the 90s makeup look. There are several that were popular within the decade. From super model bombshell looks like Cindy Crawford to grungy, undone looks by Winona Ryder, there are many routes you can take with this trend. Personally, I prefer the grungy look; A monochromatic brown smokey eye withbrown lips. Trust me, it looks a lot better than it sounds.
Let me walk you through it!
All the products I feature here are super affordable. Even though the trend is going strong in Sephora, you don’t have to break the bank to jump on this one.

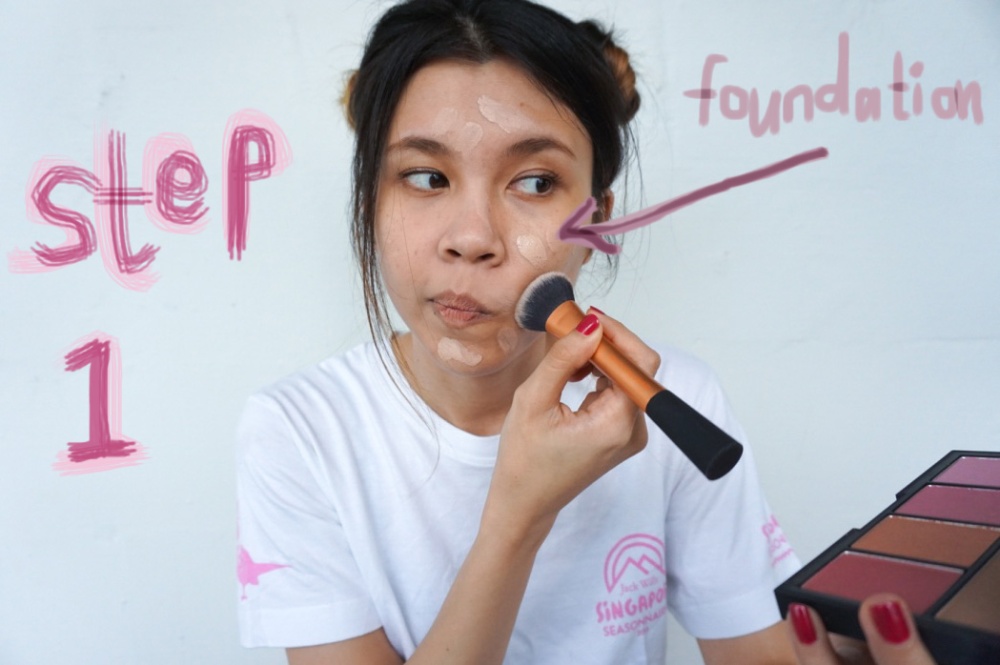
Step 1 : Let’s start with the base. Matte skin is what it’s all about. The modern take on the 90s look incorporates extremely luminous skin. But I want to pay homage to the original. To prevent yourself from looking overdone or cakey, pair your favourite matte foundation with a moisturising primer. The L’oreal 24hr Infallible foundation (£8) is great for a high coverage, flawless finish. Underneath, I’ve used the Nivea Men After Shave Balm (S$9.95) in the ‘sensitive‘ version. Made famous by YouTube as the perfect drugstore primer thanks to glycerin as a main ingredient, which helps foundation stick to it and last all day.
Step 2 : Conceal any imperfections you want to conceal and prime the lids. I don’t focus too much on have an absolutely perfect canvas. I used the Maybelline Instant Age Rewind concealer (S$18.90) in ‘Light‘. I don’t bother concealing my dark circles too much or my pigmentation because this makeup embraces imperfection.
Step 3 : Do your brows as per usual! Brows in the 90s are either big and unkempt or thin and over plucked. I suggest defining your natural brow slightly and combing it through with a brow gel to great bushiness and that textured appearance. I used the Missha Perfect Brow Styler (S$8.90) in ‘Dark Brown’ and Milani Brow Gel (S$10).
Step 4 : Let’s start with the colour! Red eyeshadow would be ideal, but it’s perfectly fine if you don’t have any. I’ve opted for a blush instead. This bright red blush is the CATRICE Defining Blush (S$6.90) in ‘I’m a Survivor‘ from a limited edition collection. But any bright red blush will do. Pack it on the mobile lid and all the way to the crease. Start with a light hand and build the colour slowly. Bring the colour with the same brush underneath the waterline, messily.


Step 5 : Grab a rusty brown shade. I chose a satin reddish brown colour from Moonshot in ‘Russet‘ (S$16) and a fluffy crease brush. Blend the edges of the red with the brown into the crease, putting the most product on the outer V of the eye. Blend the same colour under the eye with the same brush. Don’t be afraid to bring the colour lower than you are used to. If you are starting to look like a red-eyed panda, you are doing it right!
Step 6 : Line your upper lash line with a dark brown or a purplish kohl liner. Here, I used the KIKO eyeliner (£5.90) in ‘Dark Tide‘. Before it sets, use a pencil brush and dip it in a deep burgundy eyeshadow. This is from the Wet n Wild ‘Comfort Zone‘ eye palette in ‘Definer‘. Smudge the line out with this colour and go on the waterline as well to smoke it out. The darker the better!

Step 7 : Mascara. LOAD IT UP!! Go crazy. Top and bottom lashes. Use a jet black formula that is very volumizing like this Sephora Lash Plumper (S$22) in ‘Ultra Black‘.
Step 8 : Finish up the face by adding definition with bronzer and colour with blush. I used the CATRICE Sun Glow Matt Bronzer (S$6.90) in ‘Deep Bronze‘ at the hollows of my cheeks to enhance the bonze structure. This, I feel is crucial to the look as it really adds dimension. Then I topped the cheeks off with KIKO Soft Touch Blush (US$3.90) in ‘Mauve‘, a perfect muted colour that matches the eyes perfectly. Make sure to do a light dusting as cheek products were not a big focus in 90s makeup. You can even skip this step, if you’re in a pinch.


Step 9 : Last but certainly not least, complete the look with the perfect brown lipstick. Pick a shade that goes well with your skin colour. I picked shades that have reddish undertones within the brown so that it keeps my face from being washed out. For a creamier formula that is moisturising and perfect for everyday, I have Maybelline Color Sensational lipstick (S$21.90) in ‘Crazy for Coffee‘. For that super 90s feel, opt for a matte formula with the NYX Liquid Suede Lip Cream (S$15) in ‘Soft-spoken‘. A stunning mauve shade that is slightly cool toned, but incredibly flattering. This is supposedly the cheaper dupe of Kat Von D’s ‘Lolita‘.
Throw on a choker and BOOM! It’s as if you time travelled.


I’ve been using this look on almost a daily basis, even with regular clothing, that might not be in the 90s style. The grunge look is very versatile, bold and feminine at the time. It’s incredibly easy to execute too.
Try it for yourself and let me know how it turned out for you. Hop on the bandwagon, y’all!


